

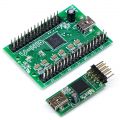


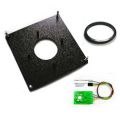
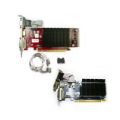


ArcadeVGA 5000 Card PCIe


PLEASE NOTE: THIS ITEM IS NOW DISCONTINUED. PAGE LEFT HERE FOR INFO ONLY
Windows 7, Windows 8 and Windows 10 32 and 64 bit drivers included. Also XP 32 and 64 bit.
SUPPORTS CRT AND LCD (DVI) DIGITAL MONITORS (See note below regarding DVI monitor limitations).
Also supports 25Khz resolutions on multi-frequency monitors.
Connect your 15Khz arcade cabinet monitor to your PC with NO special configuration in either boot screens or Windows.
You can also connect an ordinary DVI PC monitor and get all the resolutions of the 15Khz monitor plus conventional higher Windows resolutions.
- Displays all boot and Windows screens on the arcade monitor and/or PC monitor. Displays Windows desktop in a choice of resolutions including interlaced and non-interlaced.
- Connect a DVI-D PC monitor, or an arcade monitor, or both at the same time in extended desktop mode.
- Allows command-line MAME or GUI MAME to run almost all games at their native resolutions without hardware stretching, scan converters or other degradation.
- Native game resolutions are available on both the arcade and the PC monitor (See note below regarding PC monitor limitations).
- Closely emulates the original game board's graphics hardware.
- Contains 28 built-in 15Khz video graphics modes tailored specially for emulation. All of these modes also available on a PC monitor.
- Supports 25Khz modes as well, on multi-frequency monitors such asthe WG D9800.
- All 240-line modes have an exact 60Hz vertical refresh rate for best performance in scrolling games.
- Special 400 X 256 Mode timed at 53Hz vertical for games such as Mortal Kombat .
- When used with arcade monitor, all video modes timed at 15.7 Khz horizontal frequency to eliminate picture shifting on mode changes.
- Also contains all standard VGA graphics and text modes, running at15Khz. On arcade monitors. text screens display the full 25 lines without interlace using a special reduced-height font.
- All special modes available in Windows XP, Windows 7, Windows 8 and 10 at all colour depths.
- Desktop rotation supported in Windows for vertically-mounted monitors.
- Choice of Windows desktop resolutions including interlaced and non-interlaced modes. Can be assigned hot-keys .
- Run any Windows application which can use 640x480 or 800x600 on your arcade monitor including 3D games.
- On PC monitors, all the native game resolutions are available, plus conventional Windows resolutions.
- All modes locked with vertical and horizontal negative sync for easy connection via a direct cable.
- Choice of available connection methods, Via J-PAC, Via Video Amp, or Direct Cable connect.
- .Get the best from your D9800 or other multi-frequency monitor. The ArcadeVGA card will run the low frequency modes which these monitors can handle, as well as the higher VGA modes.
PC Monitor Information
This card gives the greatest benefit when used with CRT monitors and is not intended for running power-hungry games at very high PC monitor resolutions. Its important to note that LCD monitors will not give a picture which is identical to an original CRT monitor as the picture resolution will be superimposed on that of the actual LCD panel. So, what exactly is the difference in quality when using a PCmonitor between the ArcadeVGA running at the native resolution and an ordinary card running Direct 3D stretching?
The difference actually depends on what types of games you play. The most striking improvement is with older, classic games which have "graphics ROM" type character sprites such as Galaga, Pacman, Space Invaders and the like. The difference is clear.
Pictorial graphics of later games show an improvement in sharpness with no loss of detail, giving a picture where you can see each individual pixel of the original. On this typeof game it is a matter of taste as to whether you prefer this level of sharpness against a Direct3D picture which slightly blurs and softens the edges.
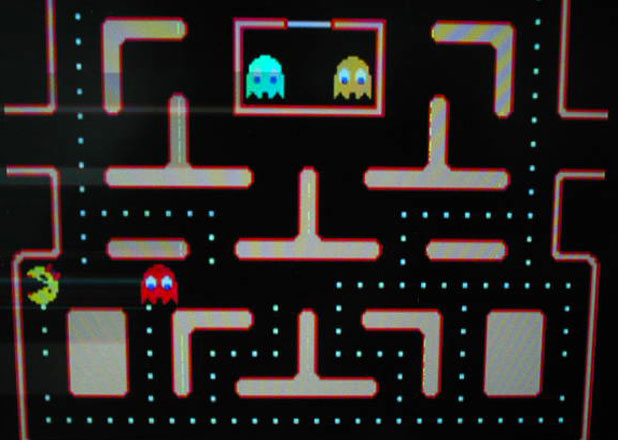
This picture shows the same game with a fixed resolution of 352 X 288. No stretch nor Direct3D

![]()
NOTE: Analog VGA PC monitors are not supported.
Before installation, check if your PC has a UEFI BIOS. If you are not sure, check in the BIOS setup screens and look for a "Secure Boot Configuration" menu. In this menu, disable "Secure Boot" and enable "Legacy Support". It has also been reported that some motherboards have a setting "PCIe Link" which needs to be set to "Gen1".
Another possible setting is "Advanced Menu, Bus Options", and "PCIE SER# Generation" must be set to Disable.
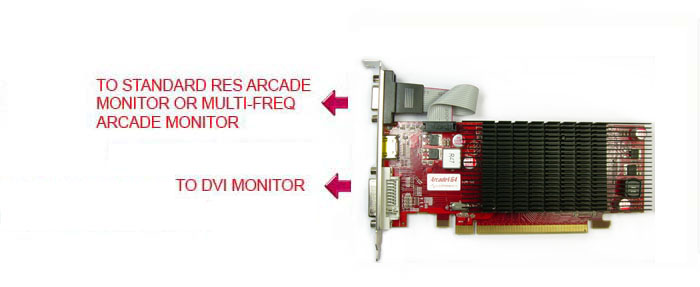
You can connect a DVI-D PC monitor or an arcade monitor or both at the same time. Extended desktop mode is supported. NOTE: Clone (Duplicate) mode is not supported.
The arcade monitor or multi-frequency monitor always connects to the 15-pin D connector on the card.
PC Monitors (including conventional or flat panel) MUST be connected tothe DVI port. If you connect to the VGA port you will get no picture.
NOTE: Only DVI-D (digital) monitors are supported on this connector, not analog VGA.
If you are using a J-PAC : Simply plug the J-PAC VGA cable into the connector on the card. The J-PAC has a built-in video amplifier for monitors that need a higher signal.
If you are using an arcade monitor with our Video Amp:
Some monitors (not Wells-Gardner) need a 5 volt video RGB signal and the ArcadeVGA card supplies 1 volt. To boost the signal level you can use our Video Amplifier. This comes with a VGA cable.
Connect the RGB, Sync, GND screw connectors to the monitor inputs.
The video amp needs no separate power source as it takes power from theArcadeVGA card.
Full information on the video amp can be found here:
Direct Connection: If not using a J-PAC or video amp, many monitors (including all Wells-Gardner) can accept a 1 volt signal level that the ArcadeVGA card supplies. So with these monitors you can make you own cable (See here for details.) or use our pre-made VGA connection cable. This cable has a connector for Wells-Gardner arcade monitors and also can be used as the base for a custom cable for other monitors as it has labelled ends.Note we are unable to supply fully assembled cables for monitors other than Wells-Gardner as there is no established standard connector or pinout for arcade monitors in a non-JAMMA setup, so we would not know what connections your monitor has. If your monitor has a single sync input (composite sync) you can connect the H-Sync and V-Sync wires together. The ArcadeVGA card always sends negative H and V sync in all video modes, so this method works fine. The connections on the VGA breakout cable are marked as follows:
R, G, B = colours
H = horizontal sync. H and V sync can normally be connected togetherfor most monitors to produce composite sync.
V = vertical sync
- = ground
These monitors can run from 15Khz scan rate up to 31Khz or above.
Plug the cable supplied with the monitor into the VGA port. If you are using a J-PAC in your cabinet, the video section of the J-PAC is not used.
After installing the ArcadeVGA drivers you will be able to select the monitor type.
Boot the PC. A normal boot screen should be displayed. You will almost certainly have to adjust the monitor for the correct picture size and centering. If the picture is rolling vertically, adjust the V-Hold control. The ArcadeVGA card produces vertical sync in the range of 50-60 Hz so you may need further adjustment to find an eventual setting that locks within this full range. Horizontal hold is not expected tobe adjusted but Wells-Gardner monitors sometimes show a slant at thetop of the screen which can be cured by adjusting this control.
If you have both an arcade and a PC monitor connected, the arcademonitor will not display a picture until Windows starts.
Install the card into the PCI express slot. The card must be installed to install the drivers.
If Windows displays a message "New Hardware Found" you MUST quit this and not let the standard Windows drivers install.
If your PC has previously had any ATI card installed, you will need to remove the existing ATI drivers. Do this by downloading and running this utility:
Start (or restart) Windows. The Windows screen should be displayed at 640 X 480 interlaced, 16 colours. To use the ArcadeVGA built-in modes the ATI driver needs installing. Insert the Ultimarc CD. Run the driver Setup program in the correct folder (XP). Reboot as prompted.Windows may ask if you want to replace newer files with old. You MUST choose to replace all the files.
Right-click on the desktop, select "properties" and set the colour depth to "32 bit colour".
Blue Screens in XP Windows XP may try to invoke the built-in Microsoft ATI driver and this will not work with the ArcadeVGA card, and causes a blue-screen error. If you see this ,re-start and hold down "F8" and choose to start in Safe Mode, then install the ATI driver from the ArcadeVGA CD. To do this, you will need to enter device manager, right click on the expanded video card listing under 'Display Adapters' (or, the undesignated option, if the device has not been recognized at all, and has a yellow X next to it), clickon properties, go to driver tab, and click on 'update driver'. This is the only way to install the driver in safe mode, as attempting to install via ATI's setup utility will produce error messages and result in a failure to install. You will need to point the driver install to the correct location on the CD as mentioned in "Forcing a driver install", further down this page.
Connect a PC monitor to the card using the DVI port. Or, if you don'thave a DVI PC monitor or the adaptor, temporarily connect the PC monitor to the VGA port.
If you are using the VGA port, you will get no picture on the PC monitor until Windows has completed its boot sequence, and auto-installed it's own ATI drivers. Unlike XP, Windows 7/8 standard ATI drivers WILL work in a basic way with the ArcadeVGA.
When a picture appears, run the Ultimarc CD and select "Vista/W7 drivers".
The first step is to uninstall any existing AMD drivers which might be on the system. To do this, select "Uninstall" and when prompted select "Custom".
Check the "Display Drivers" check box, if it is present, and continue. The existing drivers will be uninstalled and then you will be prompted to reboot.
After reboot, run the Setup program again from the CD and select "install", then continue. During install, which should take 2-3 minutes, you should see a prompt to OK installation of drivers from Ultimarc.
After the drivers have installed, reboot as prompted.
After you reboot, the TriSync config utility will start. Select your correct monitor type.
This configures the card to permit the 640x480 and above resolutions to be displayed non-interlaced at 31Khz scan or above. This results in better picture quality for these resolutions but you can only do this if your monitor can display 31Khz scan or above. If its a standard-res arcade monitor it will not.
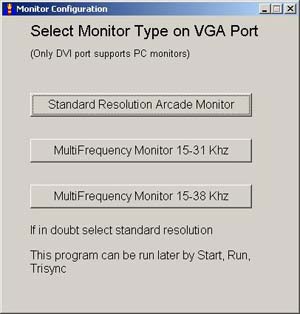
The top selection leaves the configuration unchanged. You can run this utility later if you upgrade to a multi-frequency monitor. To revert back from multi-frequency to standard res, you can simply re-install the drivers.
WINDOWS 10 MULTIFREQUENCY MONITOR FIX
Windows 10 may need some "persuasion" to use the non-interlaced modes of a multifrequency monitor. If you selected Multifrequency Monitor in the above menu it will be necessary also to do the following (once only):
From the arcade monitor:
Right click on the desktop and select "Display Settings"
Highlight the arcade monitor and select "Display Adaptor Properties"
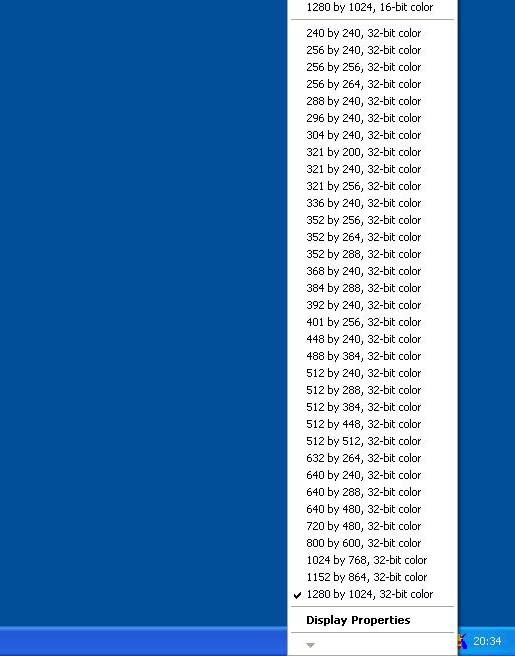
Click "List All Modes"
Select the mode shown below then OK out of the screen:

After you have installed the driver, check that it is correctly installed by clicking on the Galaga icon on the taskbar.You should see the following which is a list of all available resolutions:
This step is VITAL. If you do not do this you will not get any of the benefit of the ArcadeVGA card.
By default MAME is configured to stretch and re-process the picture to fit on whatever resolution your PC happens to be running at. YOU DO NOTWANT THIS TO HAPPEN because using the ArcadeVGA card you can have un-distorted video with a one-to-one pixel mapping.
WE STRONGLY RECOMMEND USING MAME 0.172 OR LATER
Versions of MAME prior to 0.172 did not support unscaled resolutions using Direct 3D and it is therefore necessary to use DirectDraw which is problematic on Windows 7 and later.
If you really need to use a previous version please refer to our OLD INSTALL PAGE
NOTE THE DEFAULT SETTINGS OF MAME WILL NOT GIVE GOOD RESULTS. YOU NEED TO DO THIS STEP:
You will need to check/edit the MAME.INI file, which should reside inthe Mame folder. If this file does not exist, you will need to run from the command-line:
MAME -CC
or
MAME64 -CC
After the INI file is created, open with Notepad and check the following (this is from MAME 0172. Earlier versions do not have all these options)
#
# CORE RENDER OPTIONS
#
unevenstretch 0
#
# OSD FULL SCREEN OPTIONS
#
switchres 1
#
#
# OSD ACCELERATED VIDEO OPTIONS
#
filter 0
prescale 1
See our OLD INSTALL PAGE
TheArcadeVGA card has the following built-in resolutions:
| H | V | Horizontal Refresh (Arcade Monitor) | Vertical Refresh (Arcade Monitor) | Horizontal Refresh (PC Monitor) | Vertical Refresh (PC Monitor) |
|---|---|---|---|---|---|
| 240 | 240 | 15Khz | 60Hz | 31Khz | 60Hz |
| 256 | 240 | 15Khz | 60Hz | 31Khz | 60Hz |
| 256 | 256 | 15Khz | 60Hz | 31Khz | 60Hz |
| 256 | 264 | 15Khz | 58Hz | 31Khz | 58Hz |
| 288 | 240 | 15Khz | 60Hz | 31Khz | 60Hz |
| 296 | 240 | 15Khz | 60Hz | 31Khz | 60Hz |
| 304 | 240 | 15Khz | 60Hz | 31Khz | 60Hz |
| 320 | 200 | (321 X 200 in Windows) 15Khz | 60Hz | 31Khz | 60Hz |
| 320 | 240 | (321 X 240 in Windows) 15Khz | 60Hz | 31Khz | 60Hz |
| 320 | 256 | 15Khz | 60Hz | 31Khz | 60Hz |
| 336 | 240 | 15Khz | 60Hz | 31Khz | 60Hz |
| 352 | 256 | 15Khz | 60Hz Vert on Horizontal Mon | 31Khz | 60Hz |
| 352 | 264 | 15Khz | 58Hz Vert on Horizontal Mon | 31Khz | 60Hz |
| 352 | 288 | 15Khz | 51Hz Vert on Horizontal Mon | 31Khz | 60Hz |
| 368 | 240 | 15Khz | 60Hz | 31Khz | 60Hz |
| 392 | 240 | 15Khz | 60Hz | 31Khz | 60Hz |
| 384 | 288 | 15Khz | 51Hz | 31Khz | 60Hz |
| 400 | 256 | (401 X 256 in Windows) 15Khz | 53Hz, Mortal Kombat etc | 31Khz | 53Hz (Note some LCDs cant displaythis) |
| 448 | 240 | 15Khz | 60Hz | 31Khz | 60Hz |
| 448 | 384 | Not Available | 48Khz (Requires Multi-Freq Mon) | 70Hz | |
| 512 | 240 | 15Khz | 60Hz | 31Khz | 60Hz |
| 512 | 288 | 15Khz | 51Hz | 31Khz | 60Hz |
| 512 | 384 | Not Available | 48Khz (Requires Multi-Freq Mon) | 70Hz | |
| 512 | 448 | 15Khz | 60Hz Vert on Horizontal Mon | 31Khz | 60Hz |
| 512 | 512 | 15Khz | 58Hz | 31Khz | 60Hz |
| 632 | 264 | 15Khz | 57Hz | 31Khz | 60Hz |
| 640 | 240 | 15Khz | 60Hz | 31Khz | 60Hz |
| 640 | 288 | 15Khz | 60Hz | 31Khz | 60Hz |
| 640 | 480 | 15Khz | 60Hz | 31Khz | 60Hz |
| 800 | 600 | 15Khz | 50Hz | 31Khz | 60Hz |
| Higher Resolutions | Not Available. "Dummy" resolutions are used. Right-Click and "Properties" to change back to a lower resolution if accidentally selected. | Various. Requires Multi-Frequency Monitor or PC Monitor | |||
These are in addition to all the normal VGA text/graphics modes.
The resolutions which show no vertical rate in the table have an arbitrary rate which is the result of scanning the required number of lines at 15Khz. They are mostly around 50Hz. Arcade monitor timings prevent these resolutions from being displayed at 60Hz.
Note about 224-line resolutions (eg Neo-Geo): The list does not contain any 224-line resolutions for the reason that is explained fully in the Arcade Monitor FAQ, basically arcade monitors cannot display these modes without top/bottom borders (otherwise the vertical refresh rate would be > 60Hz), so using a 240 line mode instead gives exactly the same result. (ie MAME inserts the borders instead of the resolution mode).
The ArcadeVGA card allows your PC to exactly duplicate the original game-boards video logic. To do this the resolution must match that of the original game, or be slightly higher (giving small borders). For the best gaming experience, you can over-ride MAME's choice of resolution. MAME often does not pick the best resolution. Here are some pointers: Choose a resolution that has an H and V value equal or slightly greater than the original game unless there is a resolution that is only a few pixels less, in which case choose this one. For vertical games on a horizontal monitor, choose a horizontal resolution which is about double the game resolution as you want side borders. The resolutions of 352 Horizontal are especially suited to vertical games. You will find that vertical resolutions of 240 and 200 or less are indistinguishable from each other. The reason for this is given on the arcade monitor FAQ page. A few games with a vertical resolution of between 301 and 450 will need Hardware Stretching because arcade monitors cannot display these resolutions, see arcade monitor FAQ for the reason.
There is a utility which can be used to generate INI files for MAME which tell the program which resolution to run every game.
Gavin Bensons Utility is here. (Version 1.85, updated Feb 2018) This will handle the format of newer MAME versions and has a few other enhancements. Now also runs under Win7 64 bit.
This utility will scan the game list and generate INI files which specify the best resolution for each game. After running once, you don't need to worry about choosing the resolutions again. MAME will always run every game at the optimum resolution.
| H | V | |
| 640 | 288 | Non-Interlaced |
| 640 | 480 | Interlaced |
| 800 | 600 | Interlaced |
| 1024 | 768 | XP and 2000 Auto-Pan only |
(this information does not affect gaming, only Windows desktop)
To switch resolutions, click on the "galaga ship" ![]() taskbar icon. This is installed with the ArcadeVGA drivers. If you do not have this installed, you can download the utility here. Simply add it to the "startup" group so it runs when Windows is started. This utility allows all of the modes available on the card to be selected.
taskbar icon. This is installed with the ArcadeVGA drivers. If you do not have this installed, you can download the utility here. Simply add it to the "startup" group so it runs when Windows is started. This utility allows all of the modes available on the card to be selected.
In all Windows versions, you can save resolutions as schemes and assign a hot-key to select from the control panel. See the ATI help file for details (red ATI icon).
Right-click on the ATI taskbar icon. Select "Rotation" choose correct value.
Any application which directly writes to the VGA registers will over-ride the VGA card internal modes. One such app. is Advanced MAME. If you do use this version, you will need to configure it for an Arcade Monitor so that it will write the correct timings directly to the card. Advanced MAME uses it's own timing modes not the card's built-in timing modes. The ArcadeVGA card has a lower dot-clock limit than ordinary cards so you will be able to set very low resolution modes in Advanced MAME.
Some other old DOS apps also write directly to the VGA registers and these will not work properly. In fact we no longer support plain DOS as this is not a viable OS on modern hardware.
Windows applications such as 3D games should run normally on an arcade monitor provided they can run at 640 X 400 or 800 X 600 resolution, which is the maximum an arcade monitor can display in interlaced modes. PC monitors have no restrictions of course.
We do not support using TVs for gaming for the reasons we explain in the Arcade Monitor FAQ (poor TV picture quality). There is no benefit in using the TV-out connection of this card over any other VGA card.
This procedure may be necessary if the driver does not appear to install for any reason.
From Control Panel, click "System", "Hardware", "Device Manager".
Open up the Display entry and right-click the entry "Ultimarc ArcadeVGA". Select "Update Driver".
Select "No, not this time", for searching the web for drivers.
Select "Install from a list or specific location".
Select "Don't search, I will select the driver to install"
Select "Have Disk"
A file open dialog will be displayed. Navigate to the location of the INF file on the Ultimarc CD as follows (assuming D is your CD drive)
Windows XP and 2K: D:/AVGAdrivers/XP/2KXP_inf
A list of available drivers will be displayed, select "Ultimarc ArcadeVGA".
Complete the install process. Do not choose to reboot at this time.
Ignore any warning about the driver not having been tested with your hardware.
Its possible but 25Khz medium-res monitors are rather limiting for MAME and not ideal. Very few games will be able to run at native resolutions. If you have a monitor which is capable of being set to 15 or 25, then its best to set it to 15.
You will not get any usable boot screens on a 25Khz monitor, and all games will need to run in one resolution, with hardware-stretch enabled for almost all.
To set it up:
First install the drivers using a PC monitor on the DVI port. Then run the Tri-Sync Utility. Then set the resolution to 512 X 384. (or you could use 448 X 384).
Now disconnect the PC monitor and connect the medium-res monitor. There will not be a visible screen until Windows has finished loading.
You have not configured a resolution for the game. MAME does not seem to be able to select the correct resolution for most games (MAME devs please note!), and just runs at the default (Windows desktop) resolution. You will need to check the correct game resolution (displayed on the game start screen or right click, "properties") and then select and save a matching or higher resolution (or perhaps a very close lower resolution).
PC Not booting at all, no disk activity:
If you are using a home-made arcade monitor cable, check the wiring. The only pins that should be used are the colour, sync and ground pins. All other pins such as Monitor ID, etc should not be connected. Connecting the wrong pins could cause a 5 volts power short.
Maybe the driver is not correctly installed. Try re-installing the driver.